* Welcome *

You are number...
- click the words for navigation -


| F1 Karen (Dim Sum Dolly) | M1 Lucas (EMO boy) |
| F2 Delia (Chua Hong Hong) | M2 Alvin (Guest-Of-Honor) |
| F3 Miki (pied piper) | M3 Zhao Zhi (Mr. BOO) |
| F4 Flavia (Ms. pokey) | M4 Mr. Tung Zhi Kang (Kun-jun virus) |
| F5 Siti (sweet lil thing) | |
| F6 Sajini (she smells nice) | |
| F7 Faith (she gives us hope) |


 |
 |
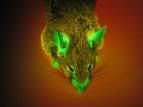 |
The protein that is responsible for the fluorescent glow in the mouse is called Green Fluorescent Protein, also known as GFP. in this experiment, we will be scaling up colonies of E.coli that is been inserted with GFP.
What is GFP?
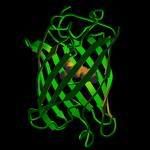
GFP is a protein that has a unique β-barrel structure that consists of 11 β-strands + 1 α-helix + chromophore running through the middle. GFP is one of the most commonly used bioreporter of a gene-expression or gene product at the molecular level.
Though GFP was first isolated and purified in the 1960s by Osamu Shimomura from Aequorea victoria, a type of jellyfish., the true potential of GFP was not comprehended until in 1987 when Douglas Prasher first thought of the idea of using GFP as a ‘tag’ that reports whenever a particular protein was being produced by a cell. Since a protein molecule was extremely small to be observed unless under an electron microscope, why not attach a marker so that it can be easily detected even by the naked eye?
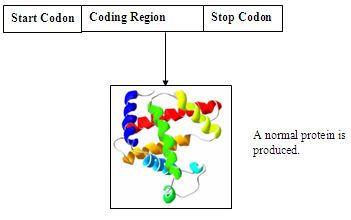
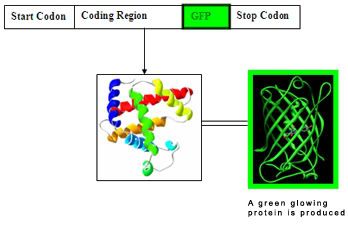
So HOW GFP is inserted into the nucleotide sequence and expressed, for example in the case of this experiment, an E.coli??
A simplify diagram of a nucleotide sequence
A simplify diagram of a GFP inserted nucleotide sequence
Overall Objectives
The main objective of the whole practical is … *drum roll*… To be able to get an A+++ for our report!!!!!! Hahaha just kidding, well that’s about 80% of the whole objective. The other 20% is to learn and experience the idea of scaling up the growth of E.coli inserted with GFP in a step-wise manner from a seed culture all the way to a bioreactor. At the end of the experiment, we also aim to be able to:
hello, hello, HELLO everyone! It’s finally the time to say goodbye! (please don’t miss me, *hands tissues to you*) sadly we’ve reached the end of our wonderful fermentation journey! (*cue; awww..) this was a highly enriching and informative journey, which brought us a lot of fun and new insights to the wired glass bottle (fermentor)! –beams-

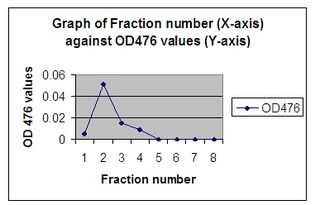
And below is the table for the absorbance reading of the fractions that contain the GFP.
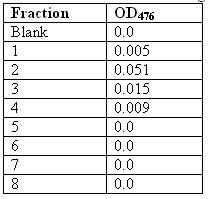
For purification, extraction that was carried out during the isolation step will be purified using Gel Permeation or Size Exclusion Chromatography. this method uses a column of polymer resins (Sephadex G75).
First up, we had to label eight test tubes (1 to 8) and a blank where the blank was filled with 2 ml of ammonium bicarbonate. Next is to carefully drain the column into a waste beaker until the buffer is just even with the top of the gel bed, ensuring that the column does not run dry. (water water!) we had to use a disposable plastic pipette to transfer the cell-free extract to the top of the gel by gently swirling the pipette around the inside edge of the column, just above the top of the packed matrix. (Mmmm!)
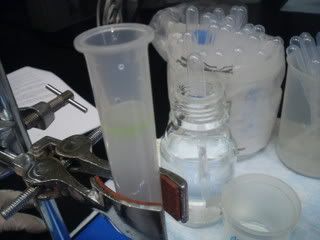
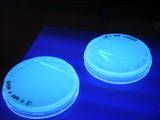
after harvesting, the product was sent for isolation and purification.
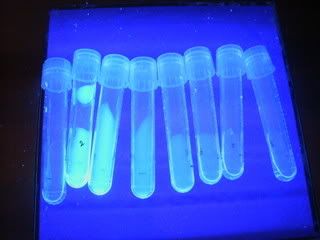
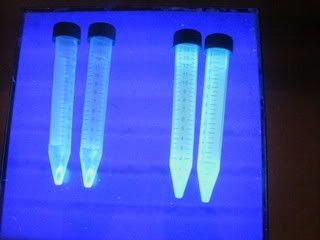
for isolation, first we collect 10 ml of culture broth into a test tube. after that we have to centrifuge at 100,000 rpm for 5 minutes. (this is basically to separate the cells from the culture broth. cells are denser so a pellet is formed at the bottom.) now it's time for us to view the product in the pellet under the UV light. (sun-tan lotion anyone?)

whee! day 5 of experiment, last day!!
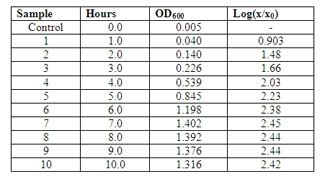
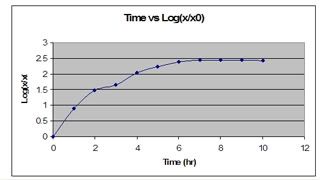
these are the absorbance value of the 10 samples at OD600, taken on day 3.
♥ flavia & faith.
btw. pH, temperature and dissolved oxygen are 3 very important control philosophy.
the temperature used to cultivate E.coli must be regulated. at a high temperature, they will be kill off as their enzymes are denatured (this will be a waste of our efforts). if they are growing at a much slower rate, the operating cost in cultivating E. coli will increase.
E. coli prefers to grow at a pH range of 4 to 8. as they are living organism, they produce wastes and require oxygen. the wastes that these organisms produced are very acidic (ouch~! i doubt ours are the same.) if the solution is not neutralize, or maintain at the optimum pH, the environment will not be conducive for their survival. if the pH is kept under the optimum pH over a period, they can only survive for a few hours to a day.
dissolved oxygen is crucial for their survival. without oxygen, they will not be able to carry out their biological processes and multiply in numbers. if so, due to the insufficient oxygen, they will die (and yes, just like any other living organism!!!). without having enough cells to replace the dead cells, soon, there will be no more live cells.
♥ flavia & faith.
this is what we did on day 4.
we harvested 10ml of the fermentation broth from a sterile, disposable tube and placed under UV light to check for presence of desired protein produced by the cells, after which we were all shipped to see the history plot and managed to derive some conclusions. GFP is a secondary metabolite. the product was harvested at the late exponential phase. this is due to the expression of the machinery for secondary metabolite biosynthesis occurs only in late exponential growth stage. however, theoretically secondary metabolites are harvested in the stationary phase-idiophase (just like their puberty stage). below shows the history plot of the process.

the controlling parameters for the history plot are:
the pH has to be maintained at pH 7.5, since the pH of an actively growing culture will not remain constant for long. pH measurement was done via pH probe which is connected to a pH meter. when the pH of media drop below 7.5, the media becomes acidic, and the computer control system sends signals to pump in sodium hydroxide into fermentor, if pH of media rises above 7.5, causing the medium to be alkaline, sulphuric acid is pumped.
temperature has great influence in the biological processes in a cell through kinetics effects (rate of reaction) and catalytic effects (enzymatic activity). a temperature probe is used to indicate if there are any changes in the temperature of the medium. at 32 oC, desired product GFP folds and fluorescence optimally. any higher temp would denature the protein, the rate of flow of cooling water or steam through the jackets ensures that the temp of fermentor is constant.
E.coli being a living organism, it requires ample amount of air to survive, or the cells will die. hence its an aerobic fermentation. therefore dissolved oxygen here is crucial. the partial pressure of O2 is set to be 20% like in the open environment. when pO2 is not 20%, the rate of injection of air bubbles by the sparger is adjusted.
♥ flavia & faith.
with the computer control system, the conditions of the fermentor at different time of the day are collected and stored also known as data logging. the system also helps perform calculations based on the mathematical models of the process also known as data analysis. the system also process control and optimization. it sends signals to pumps, valves, switches and alarms to adjust the conditions when no one is there to manually check. to sum up, IT JUST MAKE LIFE EASIER FOR US~! (how great with machines arnd??) oh yes, and we rmbed to take out 10ml medium before inoculation which is for our _____. (in case if u didnt know we meant BLANK!)day 3 of our experiment!! (:
let's recap on what we have done for the last 2 days:
seed culture from the streak plate was transferred to the shake flask --> magnified from the shake flask (E.coli cells were PROLIFERATING!!)
dont you wanna know what we did to them?!
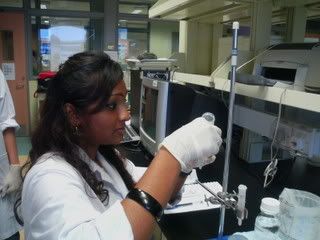
okay. we inoculated 100ml of seed culture from the shake flask to the fermentor, this is in line with increasing the yield of desired protein (the GFP), in other words, we were gradually scaling up the fermentation process. how interesting!
steak plate --> shake flask --> fermentor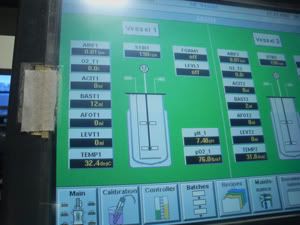 of course, the parameter has to be set first:pH 7.5stirred speed (min 10%, max 90%, control to AUTO)pO2 set point (set point 20%, control to AUTO. stir to CASC & AIRFLOW to CASC) airflow (min 25%, max 100%)
samples were drawn to monitor cell growth and product formation hourly, and we divided ourselves into pairs. (how wise were we??! (: )
each pair assigned to each hour to take the sample, at the same time computer data logging was set up by our lab tech so we could monitor the fermentor parameters.
to be continued...
♥ flavia & faith.
day 2... continues...
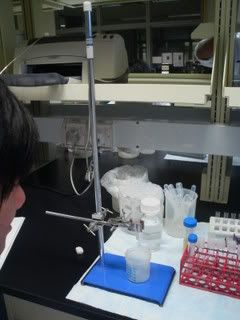
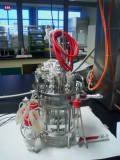
ahem.. according to the prac manual, we're suppose to set up the bioreactor as well. but.. it's so nice of the lab tech to set it up for us. think maybe they were afraid that we wld mess up the whole bioreactor?
anyway. this is what we HAVE to do if we were to set up the bioreactor by ourselves.![]()


first, we must calibrate the pH electrode by using the standard buffer solution, meaning we must measure the optimun pH levels with 2 buffers, a pH7.0 buffer and either an acid or a base buffer, depending on the range of pH that is to be measured.
then have to install the pH, pO2, foam and level probe...
the height of the foam and level probe must be adjusted if necessary. After connecting the 4 probes, more connections.. the weak acid, base and antifoam..
other accessories (air inket, exhaust filter, cooling jacket sampling unit etc) for the 'pretty' bioreactor must also be connected before using it. After dressing up, the bioreactor is ready for sterilization. Those equipments that are heat sensitive are being wrapped up in aluminium foil..
the pO2 probe must be polarized then calibrate after sterilizing. polarization means putting the probe in an O2 environment to make sure it adapt to the O2 in the bioreactor. this will ensure that the probe will read and measure the amount of O2 at a high rate when the probe is polar. and the last connection is made with the peristaltic pumps, a positive displacement pump used for pumping fluids contained within a flexible tube fitted inside a circular pump casing..♥ zhao zhi & zhi kang.
today, we're able to see the E.coli colonies growing on the media. (woweee!)

okay. here we are again. (:
after learning abt the fermenter, we went on to learn how to make the media for the seed culture and prepare the bioreator for the scaling up process.
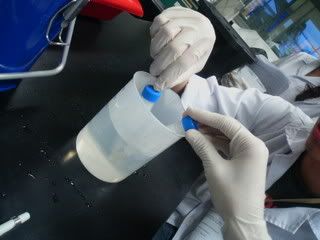
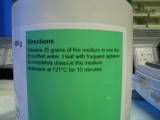
to prepare 2 litres of the LB medium, we dissolved 50g of LB powder in 2 litres of distilled water.
okay. first up was to familiarize with the parts and components of microbial and mammalian bioreactors, and to know the basis operation procedure of the bioreactor. The different parts of the bioreactor are identified and labelled. 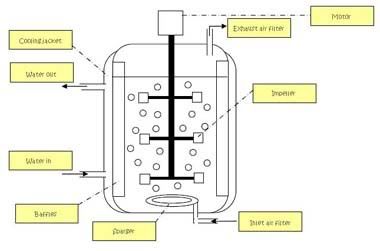
The following table shows the functions each parts of the bioreactor.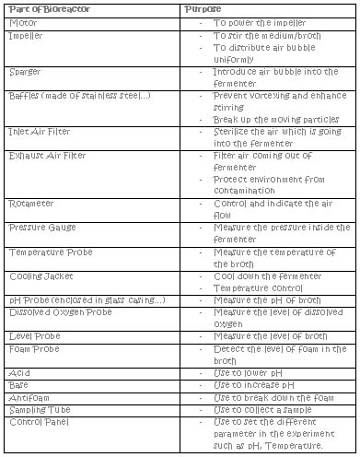
after that, we realised that the mammalian cell bioreactor is actually slightly different frm the microbial bioreactor that we are using. the mammalian cell bioreactor uses modified impeller (marine propeller type) and modified sparger for gentle aeration, whereas the microbial bioreactor uses flat-blade propeller. the mammalian cell bioreactor does not have the baffles which reduces the shear force that is crucial for the mammalian cells as they are very delicate.
that's all for now. shall post up some more info abt wat we did for the preparation of that stinky LB broth and streaking of the agar plates. (:♥ delia & alvin.
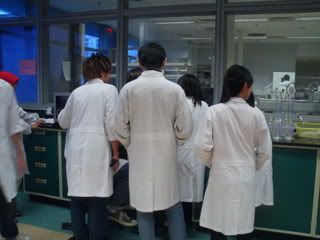
our first day for bioprocess tech practical. whee!!
our grp started off with getting to know the different parts and components of the bioreactor, and the functions of the different parts, while the other grp started off with the preparation of the stinky LB broth.
being brief-ed on the workflow of the prac. and this is wat we're gonna do for the prac.familiarization with the bioreactor and its operation
- we would be learning abt the different parts and components of the bioreactor, and their functions as well. we wld also be learning how to operate the bioreactor.equipment, media and seed culture preparation
- the media and seed culture will be prepared to get ready for the scale-up fermentation. the bioreactor is also being set-up.inoculation, fermentation and monitoring
- scale-up fermentation is being carried out to increase the yield of the desired product. the appropriate control parameters for the bioreactor is being set. manual sampling is taken to monitor cell growth and the formation of the product.isolation and purification of product
- the product is collected and isolated by 3 methods: using enzymes, freezing and thawing and sonication. purification is then done to collect the purified GFP
♥ delia & alvin.